
Appearance
Add Maytes to your Stripe Payment Element
Show Split with Maytes as a payment method inside Stripe's Payment Element. When the customer picks it, the Maytes button takes the place of your Pay button and opens the Maytes checkout. Stripe takes no payment for that order.
Is this the right page?
Use it to offer Maytes as a payment method inside Stripe's payment form. To put Maytes under Apple Pay and Google Pay instead, see Maytes in your Stripe express row: it's less work, with nothing to set up in Stripe. You can do both.
You add three things: Split with Maytes in your Stripe Dashboard, one entry in your Elements options, and the Maytes button where your Pay button goes. Your server needs the standard Maytes endpoint and webhook from the checkout button guide.
1. Create Split with Maytes in Stripe
Stripe only shows a custom payment method to the account that created it. Maytes cannot create it for you, so you add it to your own Stripe account once per environment.
In your Stripe Dashboard, open Settings → Payments → Custom payment methods and click Create.
Name it exactly
Split with Maytes.Upload this logo:

Download the logo (PNG, 1200 × 375).
Copy the
cpmt_…ID Stripe shows next to it. That is yourMAYTES_CPM_IDfor step 2.
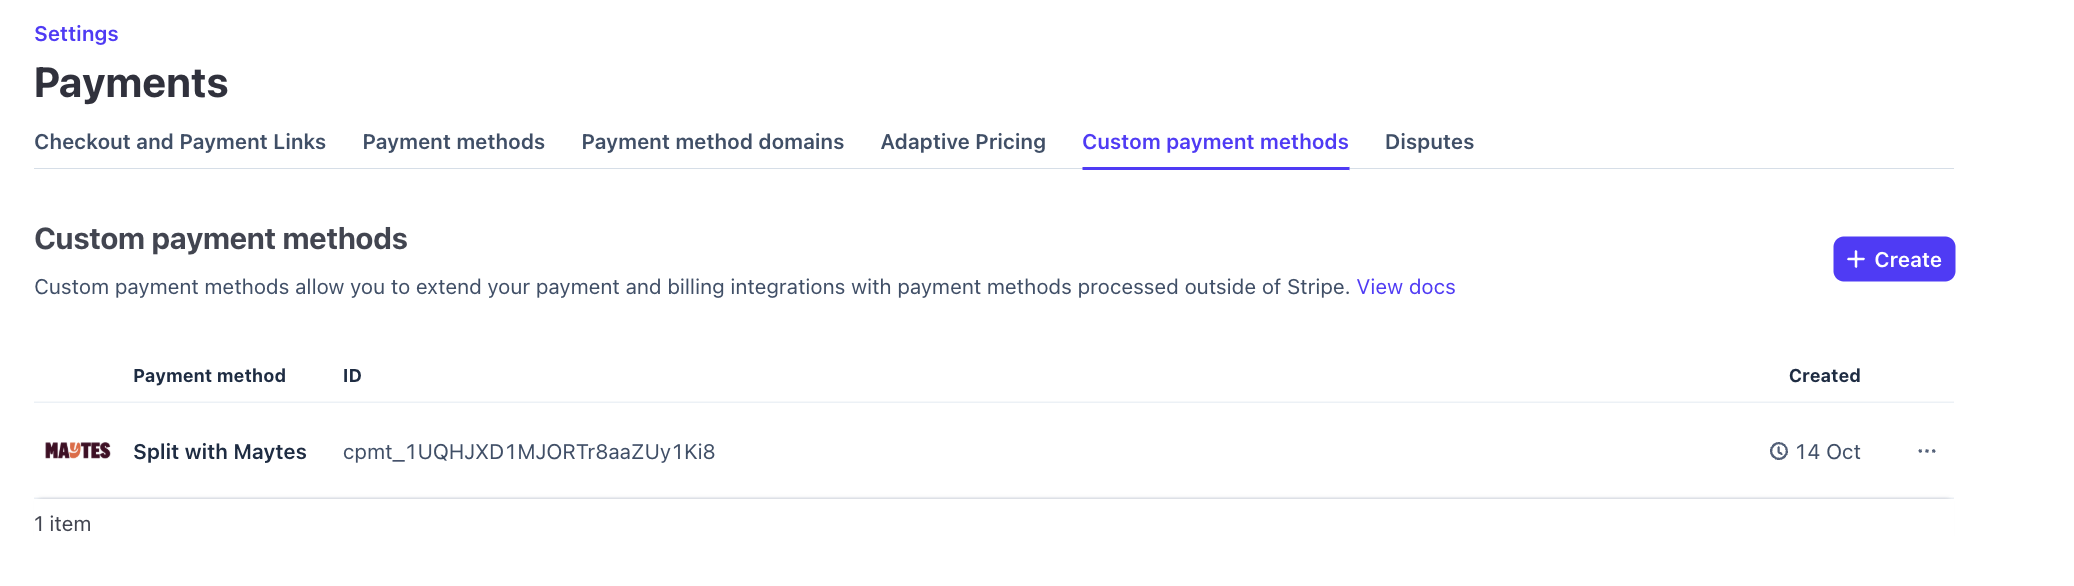
Do this in test mode and again in live mode. Each mode gets its own ID, so keep each cpmt_… beside the publishable key from the same mode.
A mismatched key and ID fail silently
If the cpmt_ ID comes from a different Stripe account or mode than your publishable key, Stripe drops it: the Payment Element just shows no Split with Maytes. The only sign is a browser console warning, The following custom payment method types are not enabled.
2. Add it to your Payment Element
Add your cpmt_ ID to customPaymentMethods. Elements must be in deferred mode: mode, amount and currency, with no client secret.
js
const elements = stripe.elements({
  mode: 'payment',
  amount: 4500, // your cart total in minor units: AUD 45.00
  currency: 'aud',
  customPaymentMethods: [
    {
      id: MAYTES_CPM_ID, // your cpmt_ ID for this Stripe mode
      payment: {
        type: 'static',
        subtitle: 'Split the cost with friends',
      },
    },
  ],
});
const paymentElement = elements.create('payment');
paymentElement.mount('#payment-element');
Stripe lists custom payment methods last. To show Split with Maytes first, pass paymentMethodOrder: [MAYTES_CPM_ID, 'card'] to elements.create('payment', …).
In React, pass the same options to <Elements options={…}>. In TypeScript, cast the Maytes entry once: Stripe reads payment, but @stripe/stripe-js 10 still types the field as options.
ts
import type { CustomPaymentMethod } from '@stripe/stripe-js';

const maytesMethod = {
  id: MAYTES_CPM_ID,
  payment: { type: 'static', subtitle: 'Split the cost with friends' },
} as unknown as CustomPaymentMethod;
3. Add the Maytes button
Show the Maytes button in place of your Pay button while Split with Maytes is selected. The Payment Element's change event tells you which method is selected.
Your Pay button is the one you already have for cards, shown here calling payWithStripe(); it doesn't change. The only Maytes part is the Maytes button, which opens the checkout itself.
html
<button id="pay" type="button">Pay</button>
<div id="maytes-button" hidden></div>

<script
  src="https://js.maytes.co/v1/checkout-button.js"
  crossorigin="anonymous"
></script>
<script>
  const maytes = window.Maytes({
    environment: 'sandbox',
    createCheckout: () => createMaytesCheckout('cart_8fd21'),
  });
  const payButton = document.getElementById('pay');
  const maytesSlot = document.getElementById('maytes-button');
  maytes.renderButton(maytesSlot, { block: true });
  payButton.addEventListener('click', payWithStripe);

  paymentElement.on('change', (event) => {
    const maytesSelected = event.value.type === MAYTES_CPM_ID;
    payButton.hidden = maytesSelected;
    maytesSlot.hidden = !maytesSelected;
  });
</script>
ts
// npm install @maytes/checkout-button
import { Maytes } from '@maytes/checkout-button';

const maytes = Maytes({
  environment: 'sandbox',
  createCheckout: () => createMaytesCheckout('cart_8fd21'),
});
const payButton = document.getElementById('pay')!;
const maytesSlot = document.getElementById('maytes-button')!;
maytes.renderButton(maytesSlot, { block: true });
payButton.addEventListener('click', payWithStripe);

paymentElement.on('change', (event) => {
  const maytesSelected = event.value.type === MAYTES_CPM_ID;
  payButton.hidden = maytesSelected;
  maytesSlot.hidden = !maytesSelected;
});
tsx
// npm install @maytes/checkout-button
import { useState } from 'react';
import { PaymentElement } from '@stripe/react-stripe-js';
import {
  MaytesProvider,
  MaytesButton,
} from '@maytes/checkout-button/react';

// Render inside your <Elements> provider from step 2.
export function Payment({ cartId }: { cartId: string }) {
  const [method, setMethod] = useState('');

  return (
    <MaytesProvider
      environment="sandbox"
      createCheckout={() => createMaytesCheckout(cartId)}
    >
      <PaymentElement onChange={(event) => setMethod(event.value.type)} />
      {method === MAYTES_CPM_ID ? (
        <MaytesButton block />
      ) : (
        <button type="button" onClick={payWithStripe}>Pay</button>
      )}
    </MaytesProvider>
  );
}
tsx
'use client'; // Stripe and Maytes both run in the browser
import { useState } from 'react';
import { PaymentElement } from '@stripe/react-stripe-js';
import {
  MaytesProvider,
  MaytesButton,
} from '@maytes/checkout-button/react';

// Render inside your <Elements> provider from step 2.
export function Payment({ cartId }: { cartId: string }) {
  const [method, setMethod] = useState('');

  return (
    <MaytesProvider
      environment="sandbox"
      createCheckout={() => createMaytesCheckout(cartId)}
    >
      <PaymentElement onChange={(event) => setMethod(event.value.type)} />
      {method === MAYTES_CPM_ID ? (
        <MaytesButton block />
      ) : (
        <button type="button" onClick={payWithStripe}>Pay</button>
      )}
    </MaytesProvider>
  );
}
vue
<script setup lang="ts">
import { onBeforeUnmount, onMounted, ref } from 'vue';
import { Maytes, type MaytesSDK } from '@maytes/checkout-button';

const props = defineProps<{ cartId: string }>();
const slot = ref<HTMLDivElement>();
const maytesSelected = ref(false);
let maytes: MaytesSDK | undefined;

onMounted(() => {
  maytes = Maytes({
    environment: 'sandbox',
    createCheckout: () => createMaytesCheckout(props.cartId),
  });
  maytes.renderButton(slot.value!, { block: true });
  paymentElement.on('change', (event) => {
    maytesSelected.value = event.value.type === MAYTES_CPM_ID;
  });
});
onBeforeUnmount(() => maytes?.destroy());

function pay() {
  payWithStripe();
}
</script>

<template>
  <button v-show="!maytesSelected" type="button" @click="pay">Pay</button>
  <div v-show="maytesSelected" ref="slot" />
</template>
ts
import {
  AfterViewInit,
  Component,
  ElementRef,
  Input,
  OnDestroy,
  ViewChild,
  signal,
} from '@angular/core';
import { Maytes, type MaytesSDK } from '@maytes/checkout-button';

@Component({
  selector: 'pay-buttons',
  standalone: true,
  template: `
    <button type="button" [hidden]="maytesSelected()" (click)="pay()">
      Pay
    </button>
    <div #slot [hidden]="!maytesSelected()"></div>
  `,
})
export class PayButtonsComponent implements AfterViewInit, OnDestroy {
  @Input() cartId = '';
  @ViewChild('slot') slot!: ElementRef<HTMLDivElement>;
  protected readonly maytesSelected = signal(false);
  private maytes?: MaytesSDK;

  ngAfterViewInit() {
    this.maytes = Maytes({
      environment: 'sandbox',
      createCheckout: () => createMaytesCheckout(this.cartId),
    });
    this.maytes.renderButton(this.slot.nativeElement, { block: true });
    paymentElement.on('change', (event) => {
      this.maytesSelected.set(event.value.type === MAYTES_CPM_ID);
    });
  }

  pay() {
    payWithStripe();
  }

  ngOnDestroy() {
    this.maytes?.destroy();
  }
}
svelte
<script lang="ts">
  import { onMount } from 'svelte';
  import { Maytes } from '@maytes/checkout-button';

  let { cartId }: { cartId: string } = $props();
  let slot: HTMLDivElement;
  let maytesSelected = $state(false);

  // onMount runs only in the browser, so SvelteKit's SSR is safe.
  onMount(() => {
    const maytes = Maytes({
      environment: 'sandbox',
      createCheckout: () => createMaytesCheckout(cartId),
    });
    maytes.renderButton(slot, { block: true });
    paymentElement.on('change', (event) => {
      maytesSelected = event.value.type === MAYTES_CPM_ID;
    });
    return () => maytes.destroy();
  });
</script>

<button type="button" hidden={maytesSelected} onclick={payWithStripe}>
  Pay
</button>
<div bind:this={slot} hidden={!maytesSelected}></div>
paymentElement is the element from step 2. block makes the Maytes button full width; add height and radius to match your Pay button (Button options). Don't call stripe.confirmPayment() for Maytes: there's no PaymentIntent to confirm.
Where createMaytesCheckout comes from
It's a small function on your page that asks your server for the checkout:
js
async function createMaytesCheckout(cartId) {
  const res = await fetch('/api/maytes/create-checkout', {
    method: 'POST',
    headers: { 'content-type': 'application/json' },
    body: JSON.stringify({ cartId }),
  });
  if (!res.ok) throw new Error('Could not create the Maytes checkout');
  const { checkout_uuid, checkout_url } = await res.json();
  return { checkoutId: checkout_uuid, checkoutUrl: checkout_url };
}
/api/maytes/create-checkout is a route on your server. It calls Maytes's POST /api/merchant/v1/checkouts with your credentials: see Create the checkout on your server.
Test and go live
- [ ] With your
pk_test_key and your testcpmt_ID, check that picking Split with Maytes shows the Maytes button, and that it opens Maytes. - [ ] Pay one order with Maytes, using a sandbox test card, and one with a card through Stripe.
- [ ] Go live with your
pk_live_key and your live-modecpmt_ID, then follow the go-live checklist.
Troubleshooting
| What you see | What to do |
|---|---|
Split with Maytes doesn't appear, console says custom payment method types are not enabled | Use the cpmt_ ID from your own Stripe account, in the same environment as your publishable key |
| Elements complains about a missing client secret | Use deferred mode: mode, amount and currency, with no client secret |
| Your Pay button still shows beside the Maytes button | Your CSS sets display on it, which overrides hidden: add [hidden] { display: none !important; } |
| The order is authorized but never captured | Your webhook must capture within 2 minutes: see Capture on the webhook |
Record Maytes payments in Stripe
A Maytes order doesn't appear in your Stripe Dashboard on its own. To show it there with a Stripe receipt, see Record Maytes payments in Stripe.
Good to know
- Stripe doesn't process a Maytes order: there's no PaymentIntent. Money arrives through Maytes settlements; refunds go through Maytes refunds, never Stripe.
- Send a cart reference, not a total: your server prices the cart from your own catalogue. See Amount rules.
- Keep Stripe and Maytes webhooks on separate routes: they use different signing secrets.