
Appearance
Maytes for WooCommerce
Add Split with Maytes to your WooCommerce checkout with one WordPress plugin. Customers check out as usual and split the cost with their mates. Your theme, your Stripe setup and your card checkout stay exactly as they are.
Is this the right page?
Use it if your store runs WooCommerce, on the Checkout block or the classic checkout. On a checkout you built yourself, add the button by hand: see Maytes in your Stripe express row.
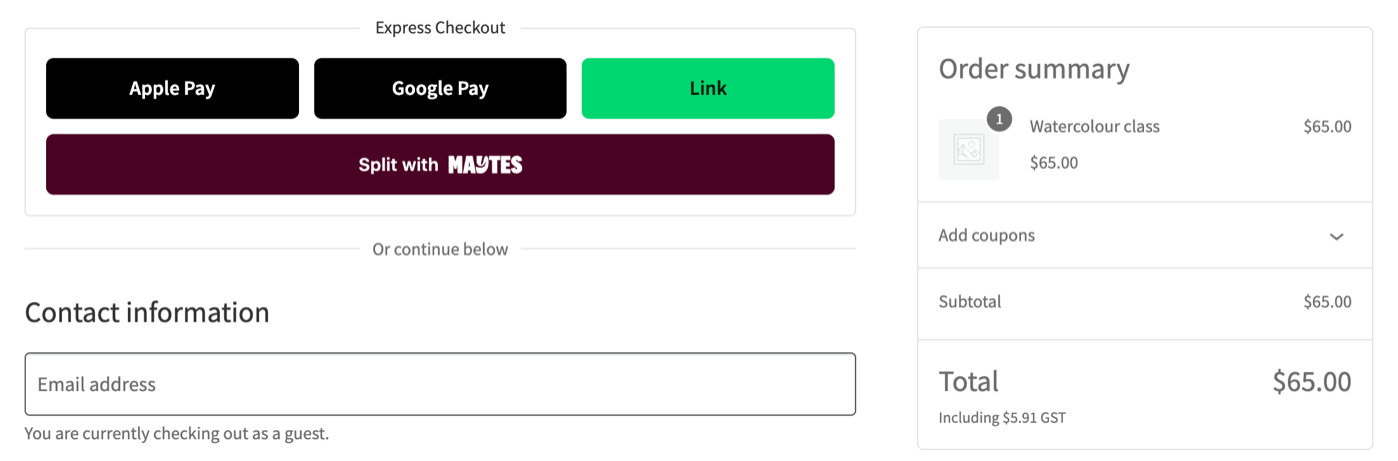
The Checkout block with the plugin. The wallet buttons are placeholders: your store shows the ones Stripe offers each browser.
The plugin adds three things:
- The Split with Maytes button, in a full-width row of its own directly under the express buttons, at the same size. It works on the Checkout block and on the classic checkout.
- A checkout route on your site,
POST /wp-json/maytes/v1/checkout, that turns the cart into a pending WooCommerce order and a Maytes checkout. - A webhook route on your site,
POST /wp-json/maytes/v1/webhook, that captures the payment and marks the order paid, so your usual order emails go out.
Setup is four steps: install the plugin, add your credentials, subscribe the webhook, then test on sandbox. No custom code is needed.
How a payment flows
The order is paid only at step 7, when the capture succeeds. The order-received page at step 8 confirms the order; it doesn't trigger the payment.
Before you start
- WordPress 6.5 or later, with WooCommerce 9.0 or later, on the Checkout block or the classic
[woocommerce_checkout]checkout. - PHP 7.4 or later. The plugin has no other dependencies: nothing to install with Composer.
- A public HTTPS site, so Maytes can deliver webhooks.
- AUD as your store currency. The button stays hidden for other currencies.
- Maytes merchant credentials for sandbox and production, from the merchant portal.
Express buttons such as Apple Pay, Google Pay and Link are optional. With them, Maytes sits in a row under them; without them, the Maytes row stands on its own at the top of the checkout.
| Setting | Sandbox | Production |
|---|---|---|
MAYTES_ENV | sandbox | production |
MAYTES_API_ENDPOINT | https://sandbox-api.maytes.co | https://api.maytes.co |
MAYTES_CLIENT_ID / MAYTES_CLIENT_SECRET | Sandbox keys from the merchant portal | Production keys from the merchant portal |
MAYTES_WEBHOOK_SECRET | Shown once, when the sandbox subscription is created | Shown once, when the production subscription is created |
Keep every setting on one environment
The button's environment comes from MAYTES_ENV, and the server calls MAYTES_API_ENDPOINT with your keys. All five settings must come from the same environment: a sandbox button with production keys fails.
1. Install the plugin
Coming to the WordPress.org plugin directory
Maytes for WooCommerce is waiting for review in the WordPress.org plugin directory. Until it's listed, install it from the zip below. Once it's listed, you can also find it under Plugins → Add New Plugin by searching for "Maytes", and get updates from there.
Download maytes-for-woocommerce.zip (version 1.0.0), then install it like any WordPress plugin:
text
Plugins → Add New Plugin → Upload Plugin
Choose maytes-for-woocommerce.zip → Install Now → Activate
bash
wp plugin install maytes-for-woocommerce.zip --activate| File | What it does |
|---|---|
maytes-for-woocommerce.php | Plugin header, compatibility with the Checkout block and HPOS, loads the plugin |
includes/class-maytes-woo.php | Renders the classic row, registers both REST routes, creates the checkout and captures on the webhook |
includes/class-maytes-woo-blocks.php | Registers Split with Maytes with the Checkout block |
includes/class-maytes-woo-api.php | Calls the Maytes API with the WordPress HTTP API, with the OAuth token |
includes/class-maytes-woo-webhook-verifier.php | Verifies the webhook signature, ported from the Maytes PHP SDK |
assets/js/maytes-blocks.js | The express payment method on the Checkout block |
assets/js/maytes-classic.js | Places the row on the classic checkout and renders the button |
assets/css/maytes.css | The full-width row on both checkouts |
Until step 2 is done, the button stays hidden and WordPress shows a notice on the Plugins screen.
2. Add your credentials
Add five constants to wp-config.php, above the line /* That's all, stop editing! */. They stay on your server: the plugin never stores them in the database or sends them to the browser. Start with sandbox values.
php
define( 'MAYTES_ENV',            'sandbox' );                       // 'production' when live
define( 'MAYTES_API_ENDPOINT',   'https://sandbox-api.maytes.co' ); // live: https://api.maytes.co
define( 'MAYTES_CLIENT_ID',      '…' );
define( 'MAYTES_CLIENT_SECRET',  '…' );
define( 'MAYTES_WEBHOOK_SECRET', '…' );                             // from step 3
3. Subscribe the webhook
In the merchant portal, subscribe your store's webhook route to the checkout.authorized and checkout.voided events:
text
https://shop.example.com/wp-json/maytes/v1/webhookThe portal shows the signing secret once, when the subscription is created. Copy it into MAYTES_WEBHOOK_SECRET. Then send a webhook.test event from the portal and check that the delivery log shows a 2xx. See Managing your subscription.
Plain permalinks
If Settings → Permalinks is set to Plain, /wp-json/ routes don't resolve. Pick any other structure, or subscribe https://shop.example.com/?rest_route=/maytes/v1/webhook instead.
4. Test, then go live
Run every check on sandbox before you switch anything to production. The test cards are on the sandbox page.
- [ ] Pay with
4242 4242 4242 4242. The order moves to Processing with a "Paid with Split with Maytes" note, and your order emails go out. - [ ] Pay with the decline card
4000 0000 0000 0002. The order stays Pending payment and nothing is captured. - [ ] Click the button with the email empty. The checkout shows its usual error and no order is created.
- [ ] Apply a coupon. The Maytes total matches the WooCommerce total to the cent.
- [ ] Open two Maytes windows for one cart and pay in the first. The second checkout is cancelled if it authorizes.
- [ ] Check the row at phone width, and with every express button your browsers offer. Maytes stays a full-width row under them.
- [ ] Send
webhook.testfrom the portal. The delivery log shows a 2xx. - [ ] Go live: set
MAYTES_ENVtoproductionandMAYTES_API_ENDPOINTtohttps://api.maytes.co, add your production keys, and subscribe the production webhook with its own secret.
How the plugin works
This section is for your developer. It explains what the plugin does on each request, so nothing here needs to be built.
The button
The button script loads from https://js.maytes.co/v1/checkout-button.js with crossorigin="anonymous", only on the checkout, and only when the cart is in AUD and needs payment. The button matches the express buttons: block: true fills the row, height: 48 and radius: 6. mode stays at its default, popup; on phones the button opens Maytes in the same tab.
On the Checkout block, Split with Maytes is an express payment method. WooCommerce lays express buttons out in a grid; while Maytes is there, the wallets keep sharing their row and Maytes takes a full-width row after them. If you set a button height or corner radius in the Checkout block's express payment settings, Maytes uses them too. Maytes appears on the checkout only, not on the Cart block, because it needs the customer's details.
On the classic checkout, the plugin prints an empty #maytes-express-row on the woocommerce_checkout_before_customer_details hook. The script moves it directly under Stripe's express element and renders the button, and moves it back each time WooCommerce refreshes the checkout (updated_checkout).
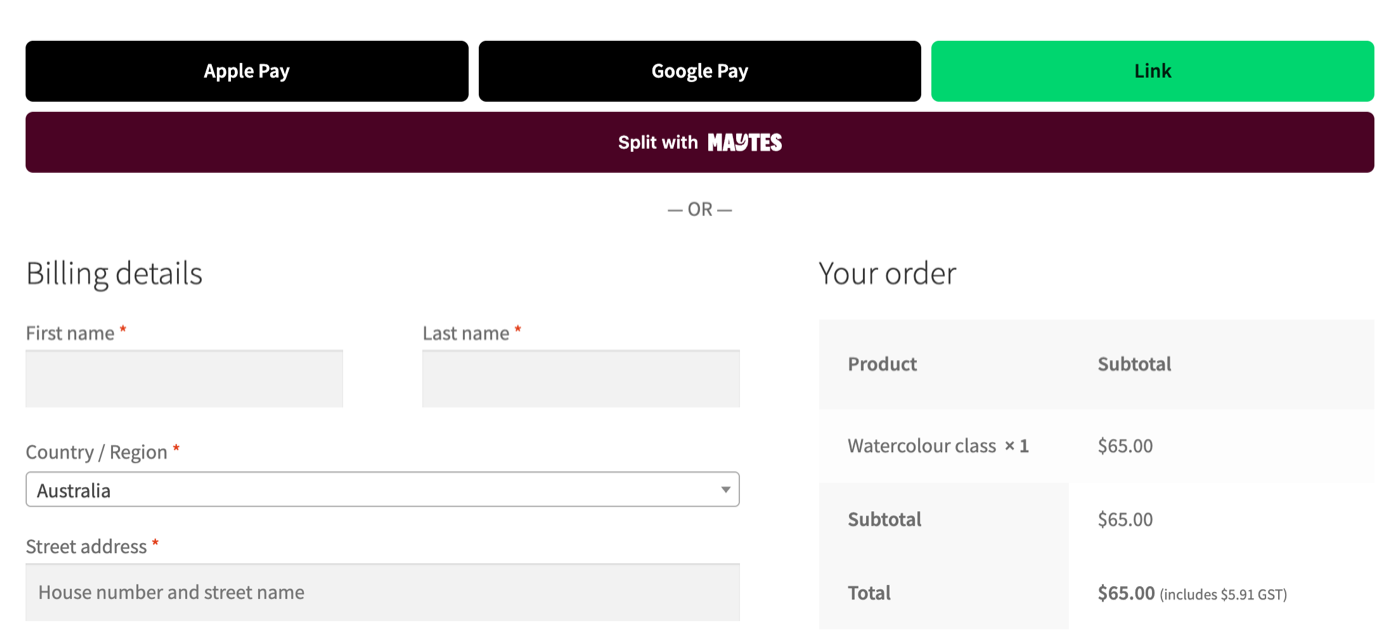
The classic checkout on the Storefront theme. The wallet buttons are placeholders for Stripe's express element.
| Element on the classic checkout | What changes |
|---|---|
#wc-stripe-express-checkout-element (Link, Apple Pay, Google Pay) | Nothing. Stripe's iframe is never moved, because moving an iframe reloads it |
#maytes-express-row | New. Inserted directly after Stripe's element |
#wc-stripe-express-checkout-button-separator ("— OR —") | Nothing. It now sits under Maytes |
| Billing details, order review, card payment | Nothing |
The button checks the customer's details first. Maytes doesn't return a name, email or address, and your orders need them for the confirmation email. If a required field is empty, the email is invalid or the terms box is unticked, the customer sees the checkout's usual error and no order is created: inline field errors on the Checkout block, WooCommerce's error list on the classic checkout. Wallets like Link skip this check because they supply the details.
On click, the button posts the customer's details to /wp-json/maytes/v1/checkout with a WordPress REST nonce and a plugin nonce. It maps the reply to { checkoutId: checkout_uuid, checkoutUrl: checkout_url }, and opens that URL. On the Checkout block, closing the Maytes window hands the checkout back, with the customer's previous payment method selected.
Creating the checkout
POST /wp-json/maytes/v1/checkout builds the order with WooCommerce's own WC_Checkout::create_order(), so coupons, GST, shipping, booking dates and any other order data come out exactly as they would for a card payment.
- Load the cart. Return
400if it's empty. - Check the details: on the classic checkout, every required billing (and shipping) field, the email format and the terms box; on the Checkout block, which validates its own fields in the browser, the email. Return
422with the messages if any fail. - Create the pending order, or reuse the one in the session's
order_awaiting_payment, so a second click on the same cart doesn't create a second order. - For a new order, fire
woocommerce_checkout_order_processed, so booking and stock plugins react as they do for a card checkout. - Create the Maytes checkout.
- Save
checkout_uuidon the order as_maytes_checkout_uuid. Every uuid is kept, in case the customer opens two windows. - Return
checkout_uuidandcheckout_urlexactly as Maytes sent them.
php
$created = self::api()->create_checkout( array(
	'merchant_order_id' => (string) $order->get_id(),
	'total_amount'      => self::minor( $order->get_total() ), // cents
	'currency'          => $order->get_currency(),
	'return_url'        => $order->get_checkout_order_received_url(),
	'cancel_url'        => wc_get_checkout_url(),
	'items'             => $items, // category 'other' line items
) );
The plugin calls the Maytes API with the WordPress HTTP API, so it needs no Composer packages. It gets an OAuth token from /oauth/token with your client credentials, and fetches a new one once if a call returns 401. If Maytes returns 409 order_already_authorized, the customer is told the order is already being paid with Maytes.
How amounts are sent
Maytes rejects a checkout with 422 invalid_amount_arithmetic unless the line items add up to total_amount (Create a checkout). Coupons reduce each line's total, and prices that include GST carry their GST, so every line goes out at its final price in cents. For example, a $65 class with a $13 coupon:
| WooCommerce line | Amount | Sent to Maytes |
|---|---|---|
| Watercolour class, 1 seat | $65.00 | One item, unit_price 5200 |
Coupon SPRING20 | −$13.00 | Included in the item price |
| GST (included) | $4.73 | Included in the item price |
| Order total | $52.00 | total_amount 5200 |
Fees and shipping go out as their own items. If your store prices exclude tax, the tax goes out as its own item too. If rounding leaves the lines a cent away from the total, or a fee is negative, the plugin sends a single "<Your store> order #…" line for the exact total instead.
Confirming the payment
An order is paid only when Maytes sends checkout.authorized and the plugin's capture succeeds. Capture must happen within 2 minutes, so the plugin captures straight away and leaves the emails to WooCommerce.
php
$event = Maytes_Woo_Webhook_Verifier::verify(
	$request->get_body(),                       // the raw bytes, never re-encoded JSON
	$request->get_header( 'x-maytes-signature' ),
	MAYTES_WEBHOOK_SECRET
); // throws Maytes_Woo_Webhook_Error: reply 400

self::api()->capture_checkout( $uuid, array(
	'expected_total_amount' => self::minor( $order->get_total() ),
	'currency'              => $order->get_currency(),
	'merchant_order_id'     => (string) $order->get_id(),
) );

$order->payment_complete( $uuid ); // your usual order emails go out
Each step leaves a note on the order, newest first:
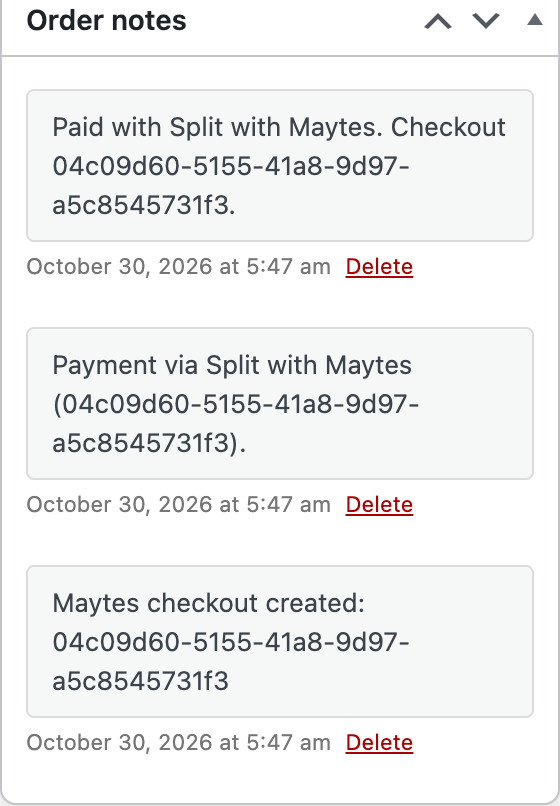
The verifier is ported from the Maytes PHP SDK: it checks the signature over the raw body, accepts either signature during a secret rotation, compares in constant time and rejects deliveries more than 5 minutes old. The order is found by merchant_order_id, and the event's checkout_uuid must be one saved on that order. Processed event ids are kept for 4 days, because deliveries are at-least-once.
| Situation | What the plugin does | Reply |
|---|---|---|
| Bad or stale signature | Logs the reason and stops | 400 |
| Event id already handled | Nothing | 200 |
| Unknown checkout, order already paid, or order no longer payable | Cancels the checkout, to release the customer's funds | 200 |
Your maytes_woo_can_fulfil filter returns false | Cancels the checkout, and the order is marked Failed | 200 |
| Capture succeeds | payment_complete(), and an order note | 200 |
Capture returns 409 or 422 | The order is marked Failed | 200 |
Capture hits a network error or a 5xx | Nothing yet: Maytes retries inside the 2-minute window | 503 |
checkout.voided on an unpaid order | The order is marked Failed, with the reason | 200 |
Order statuses
A Maytes order uses WooCommerce's usual statuses, and Split with Maytes shows as its payment method.
An order moves to Failed when its authorization is voided or expires, when the capture is refused, or when your filter releases it. A declined card doesn't change the order: the customer can try again in the Maytes window, and the order stays Pending payment. Like any unpaid WooCommerce order, it's cancelled after your Hold stock time when stock management is on.
Last-minute checks
Use the maytes_woo_can_fulfil filter to release a payment before any money is taken, for example when a class has just filled up. It runs inside the webhook, after the authorization and before the capture, so keep it fast: deliveries time out after 15 seconds.
php
add_filter(
	'maytes_woo_can_fulfil',
	function ( bool $can_fulfil, WC_Order $order ): bool {
		return $can_fulfil && my_store_has_seats_for( $order );
	},
	10,
	2
);
Returning false cancels the Maytes checkout, so the customer's funds are released and nothing is captured. Run longer checks before the customer reaches the checkout.
Troubleshooting
The plugin logs to WooCommerce → Status → Logs, under the source maytes.
| What you see | What to do |
|---|---|
| No Maytes button, and a "needs your Maytes settings" notice | Add all five constants to wp-config.php, with MAYTES_ENV set to sandbox or production |
| No Maytes button, and no notice | Check that the store currency is AUD and that the cart has something to pay. Maytes shows on the checkout, not on the cart |
| Maytes sits at the top of the classic checkout, not under the wallets | Stripe's express buttons aren't on the page. Turn on express checkout in the WooCommerce Stripe Gateway settings |
| "We couldn't start Split with Maytes" | Check the maytes log. Usually the keys don't belong to the environment in MAYTES_API_ENDPOINT |
The delivery log shows 404 | Your permalinks are set to Plain: see step 3 |
The delivery log shows 400 | The signing secret doesn't match this subscription. Each environment has its own secret |
The delivery log shows 401 or 403 | A security plugin or firewall is blocking the REST API. Allow POST /wp-json/maytes/v1/webhook |
| The order stays Pending after a successful payment | Check that the subscription includes checkout.authorized and that the delivery log shows a 2xx |
Good to know
- Maytes payments stay outside Stripe. They don't appear in your Stripe Dashboard, the money arrives through Maytes settlements, and refunds are made in the Maytes portal, not from the WooCommerce order screen. To show them in Stripe as well, see Record payments in Stripe.
- Nothing to turn on under WooCommerce → Settings → Payments. The plugin adds its own button, so Maytes isn't listed as a gateway there.
- Customer details: Maytes returns no name, email or address, so the button checks your checkout form first.
- Questions: email support@maytes.co.
Related: Maytes Checkout Button · Maytes in your Stripe express row · Create a checkout · Webhooks · Capture & checkout status · Sandbox environment